Skip to Content

Homemade Lox for Passover

Sharing is caring!

This Homemade Lox for Passover recipe for delicious Jewish lox has only 5 ingredients and is so amazingly easy to make.

Easy Homemade Lox on a cutting board

Normally eaten with a bagel, lox is an amazing deli food made from brined or cured salmon, or it can be smoked.

If you love lox that is not smoked, Easy Homemade Lox is perfect for you, because it will allow you to bring the deli to your kitchen at a fraction of the cost! And while you can’t have the lox with a delicious bagel during the week of Passover, you certainly can have it plain or with Matzo!

The process is simple.

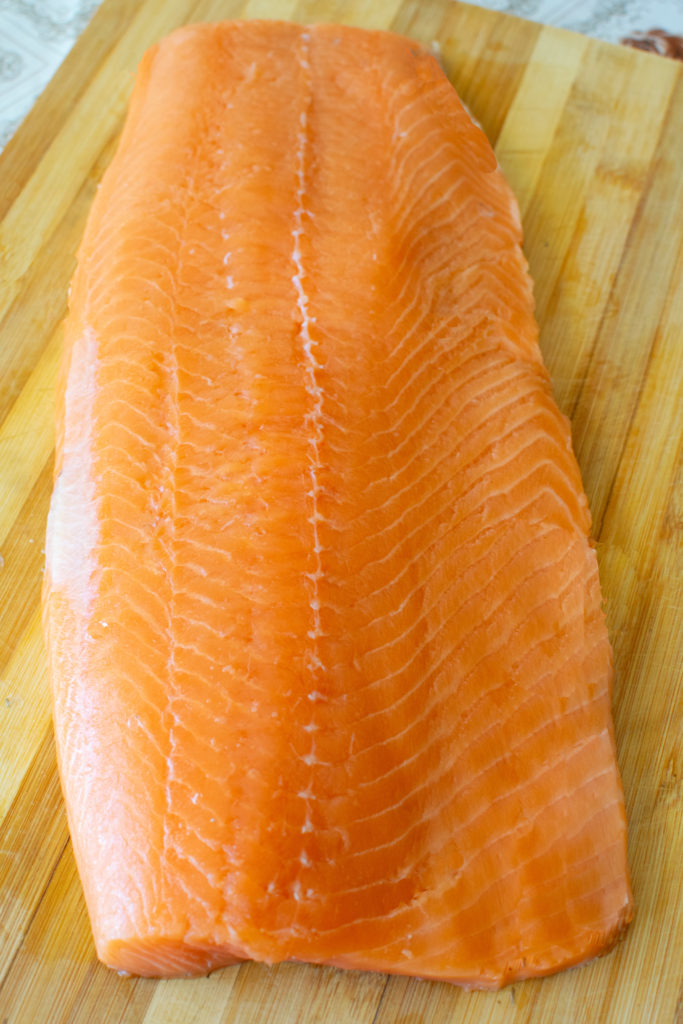
Take a piece of raw salmon:

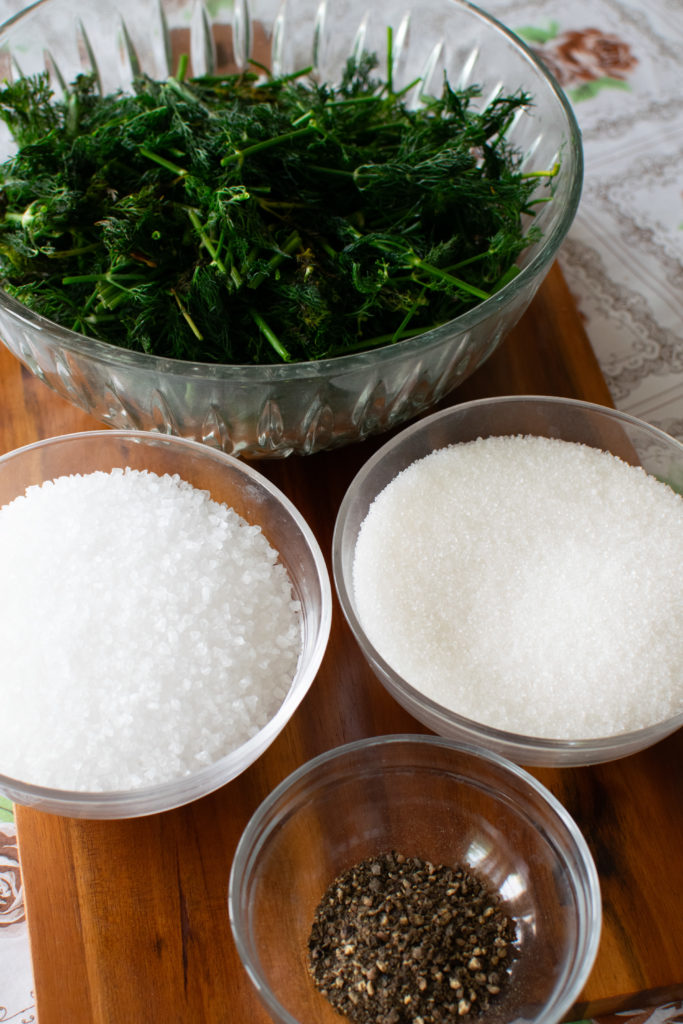
Gather the rest of the ingredients together:

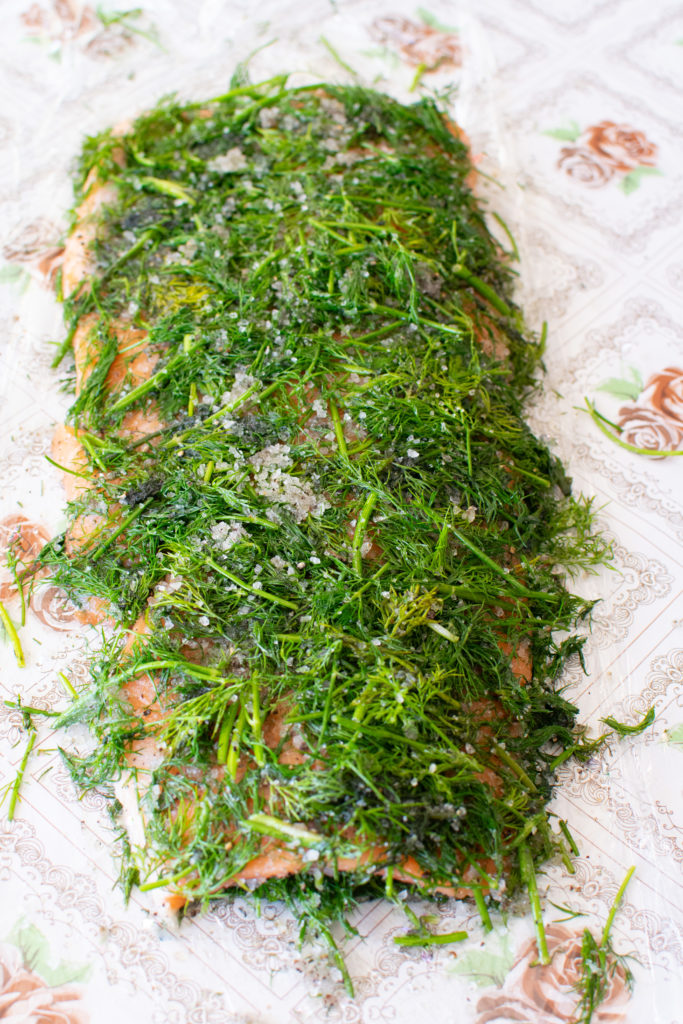
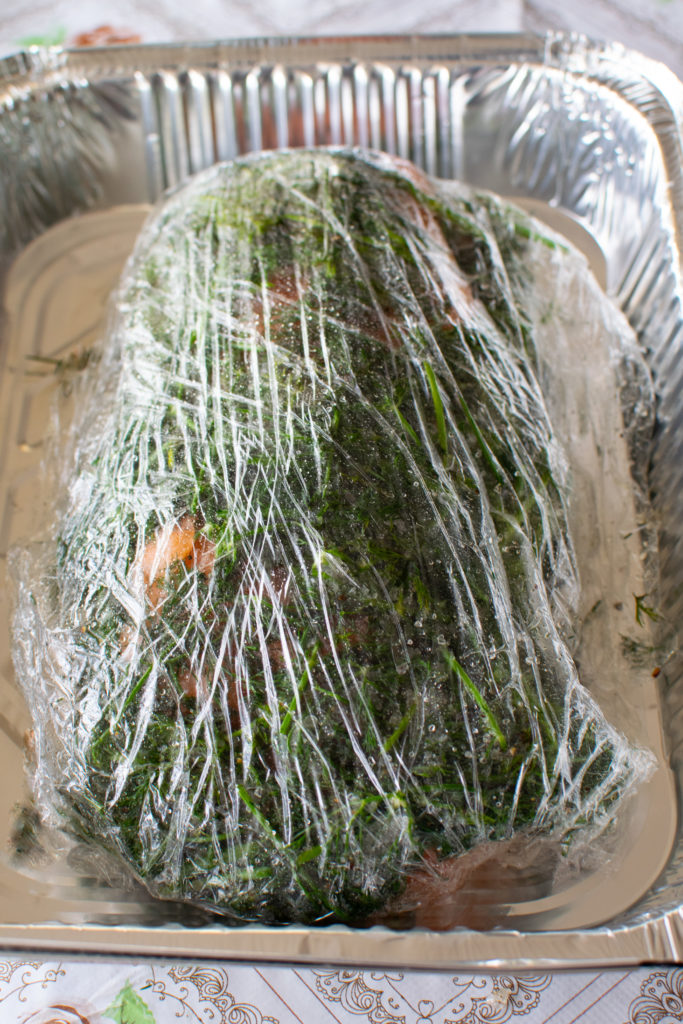
Smother the entire piece of salmon with the dill, salt, sugar, and pepper.

Wrap well in plastic wrap and place in a baking pan that is large enough to hold the entire thing:

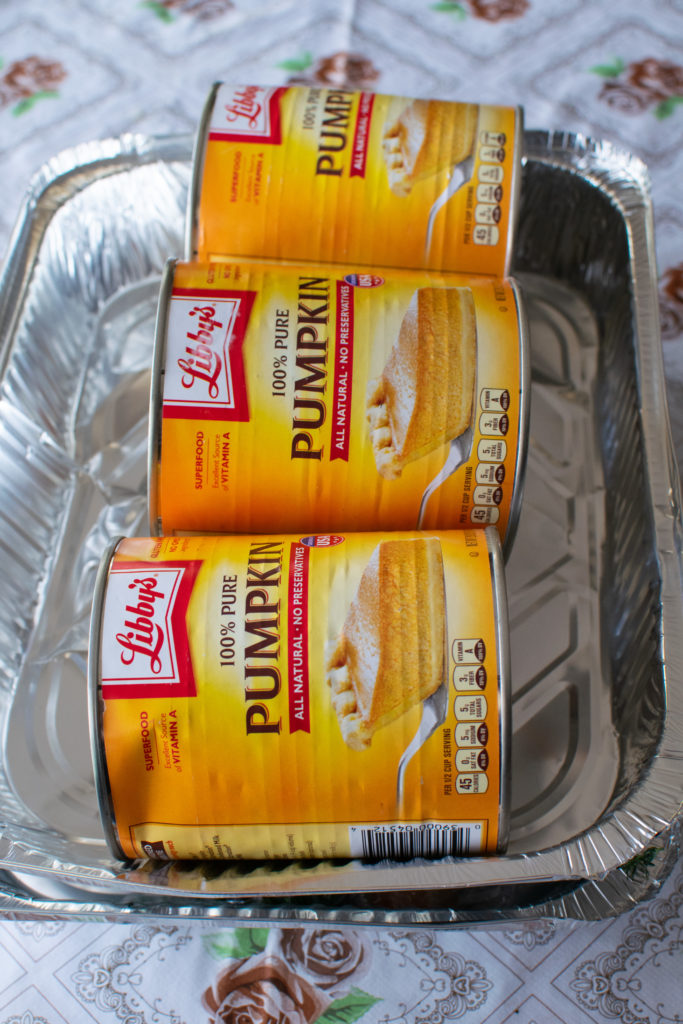
Then place another baking pan on top of the wrapped salmon and weigh it down with something heavy, such as large canned goods.

Then, place in the refrigerator and follow the rest of the very simple instructions. That’s it!

And you know what? You can eat this on the day of the seder because it contains no matzo!

Eating on the day of the seder

Jews who keep the laws of Passover do not eat matzo or any foods that contain anything from matzo (such as matzo meal or matzo cake meal) the entire day before the seder, which is in the evening.

Some people even have the custom of not eating such foods for two weeks before, beginning on Rosh Chodesh Nissan or even as far back as Purim, which is a month before.

General information regarding cooking:

The following information may not particularly pertain to this recipe but rather answers general useful questions related to cooking.

What are the different oils used in cooking?

“High-heat” oils have neutral flavors and have been processed in order to handle high temperatures and are good for sautéing, searing, and frying. These include canola oil, vegetable oil, avocado oil, and grapeseed oil, each with its own “best for” with chefs.

Some oils have their own flavor and are good for sautéing and roasting and add a little extra to the dish. These include extra virgin olive oil, coconut oil, and peanut oil. Extra virgin olive oil works well with roasting or sautéing, but not for deep frying.

Coconut oil is good in dishes where a slightly coconut flavor enhances the dish, and peanut oil is good for deep frying and will add a subtle nutty taste and smell. Many Asian dishes call for peanut oil in the ingredients.

Then there are oils that are not used with heat but rather for dressing up foods, such as sesame oil, flaxseed oil, and walnut oil, among others.

What does it mean when recipes say “to taste” about an ingredient?

When recipes say “to taste,” it means that you can put in as little or as much as you like to your own taste. Some recipes have many ingredients that a cook can adjust to their own taste when cooking (not so much when baking though).

The best way to calculate what your taste is with a recipe that you are not yet familiar with is to first taste the dish and then add the “to taste” ingredient GRADUALLY, a little at a time—a splash of this or a pinch of that—until the dish is just the way you like it. Make sure to stir the ingredient after each time you add it so that the flavor will distribute evenly and become part of the dish. Then taste again. Repeat until you reach your personal preference.

Note: If you plan on using the recipe again, it is highly recommended to make a note of what and how much you added so that you can refer to it next time.

What does it mean when a recipe says that an ingredient is “optional”?

If an ingredient is “optional,” it means that you can add it in or not based on your own preference. An optional ingredient can be flavor related (i.e., salty, sweet, spicy, etc.), appearance related (garnish), or even something like nuts or chocolate chips in baking.

What does “savory” mean?

“Savory” refers to foods that are not sweet, such as foods that taste salty, spicy, or herbal.

What cooking measurement expressions mean:

Drop – ¹/₆₄ teaspoon (or less—it’s however a literal drop comes out)

Smidgen – ¹/₃₂ teaspoon

Pinch – ¹⁄₁₆ teaspoon (what you can grab between your finger and thumb)

Dash – ⅛ teaspoon (what comes out when you shake out of a shaker or bottle)

Tad – ¼ teaspoon

Dollop—a glob on a spoon (like with mayonnaise or ice cream)

Scant—a scant cup is almost a cup, just below the line.

Heaping—above the line of the spoon (teaspoon, tablespoon)*

Some useful cooking terms:

Sauté: Cooking quickly in a small amount of oil or fat in a frying pan on a relatively high heat that causes a slight browning of the food on the outside.

Sear: Browning the outside of meat at a high temperature.

Sweat: Cooking vegetables (often onions) in a little oil or fat on a low heat until they become soft and translucent (no browning).

Simmer: Heating liquid to just below the boiling point (has slow bubbles).

Boil: Cooking food submerged in water hot enough to have rapid, rolling bubbles.

Poach: Cooking in a liquid, or partially submerged, on low heat.

Roast: Cooking with consistent dry heat in an enclosed space, over 400 degrees Fahrenheit.

Bake: Cooking with dry heat in an enclosed space, under 400 degrees Fahrenheit.

Broil: Cooking with intense heat from above.

Grill: Cooking with heat from below, typically over a flame or coals.

Braise: Cooking already-seared meat in a small amount of liquid in a covered pot.

Blanch: Quickly submerging food into boiling water and then immediately into ice water to stop the cooking.

Steam: Cooking with vapor from hot simmering water from below.

Shred: Creating long, thin strips (not necessarily uniform) of vegetables, like in coleslaw.

Grate: Scraping food against a surface with rough, tiny holes that break it down into very small, fine pieces.

Zest: The scrapings of the colorful outer skin of a citrus fruit.

Mince: Cutting into the smallest pieces possible.

Dice: Cutting into small cubes.

Chop: Cutting into small (bite-size) pieces.

Julienne: Cutting into long, thin strips (like matchsticks).

Glaze: a thin liquid with high-sugar or high-fat coating applied to food or baked goods that gives a shiny look and adds flavor.

Fold in: To gently combine a light ingredient into a heavier one.

Al dente: Cooking rice or pasta to the point before it gets soft (is slightly firm).

Emulsify: Forcing two liquids together that don’t normally combine (like oil and vinegar) into a smooth sauce or dressing.

Deglaze: Adding a liquid to a hot pan after searing meat to loosen the browned bits (called fond) that got stuck.

Slurry: A mixture of liquid and dry starch, such as cornstarch or potato starch, into a paste that is used to thicken sauces and soups. One can use flour to make a slurry as well.

Roux: (pronounced “roo”) is a cooked mixture of fat and flour.

Food on Passover

Torah-observant Jews do not eat chametz (the fermented products of five grains: wheat, spelt, barley, oats, and rye).

In addition, Torah-observant Ashkenazi Jews do not eat kitniyot (or kitniyos as pronounced in Ashkenazi Hebrew). These include legumes, corn, rice, and similar foods that were deemed forbidden to eat by rabbis in the medieval period and are still not eaten today. Sephardi and Mizrachi Jews do not follow this tradition.

Many observant Ashkenazi Jews will not even eat the derivatives of these kitniyot, while others do (each family holds their own traditions regarding this).

Then, there are Ashkenazim who don’t eat “gebrokts” (or gebrochts).

Gebrokts (gebrochts) means “broken” in Yiddish, and in this case refers to matzo that has absorbed liquid. Not eating gebrokts is observed by many in the Hasidic Jewish community and Ashkenazim who have taken on this tradition, where they basically don’t mix anything wet with matzo.

So, things like matzo sandwiches, fried matzo, and even matzo balls are a no-no for them.

There is a joke that sums it all up:

On Passover, we should remember people who have little to eat on this holiday. They are called Ashkenazim.

Over the years, I have learned to adapt “normal” food for Passover so that my family won’t complain about boring, tasteless, or repetitive meals.

I find that having good food and variety makes the week of Passover a very pleasant experience, and I hope this recipe will help make yours just that!

Everyday pantry essentials (suggested)

As I learned to prepare more and more recipes, I also learned which basics and seasonings are good to have on hand to have the ability to make a dish on short notice and not have to run out to the store or borrow from a neighbor.

While I will admit that I am not always prepared when one of my kids asks for eggplant parmesan or lasagna at the drop of a hat (which they have done), I dislike having to postpone making something just because the ingredients needed to make a reasonable meal were not readily available.

So, I maintain a selection of what I consider “pantry essentials” in my refrigerator and on my shelves at all times.

Initially, many of the herbs and spices were useful to me only on occasion (having been purchased for a particular recipe), and I usually just had them around as leftovers. However, as I began to cook more of a variety, I was really glad to have them (hey, look, I already have that!). And that is how my list began.

While, of course, most of the essentials will not be needed just for any one recipe, at least some of them are needed for most recipes, and you would be surprised how many recipes can be made just with this list. So, if you keep whatever you use regularly on hand, it can really save you time and effort.

Everyone has their favorite recipes, preferred seasonings, and just whatever they like to use to cook. Your own list should certainly reflect your own cooking tastes and style.

Just to give you an idea, the list below is a comprehensive list of what I normally keep on hand (this does not necessarily include what I keep for baking, and there may be some overlap between the two lists as some items are used for both, such as brown sugar), and, of course, it reflects the meals and desserts that I like to make for my own family and guests.

Utensils:

  • Measuring cups for liquid
  • Measuring cups for solids (flour, sugar, etc.)
  • Measuring spoons
  • Mixing bowls
  • Kitchen scale

NOTE: When using measuring cups and spoons, make sure that the measurements are comparable to one another (example: that 4 tablespoons equals 1/4 of your measuring cup). You’d be surprised to know that not all measuring cups are the same, and this can throw your measurements off.

Seasoning and flavoring:

  • salt (my recipes use regular table salt)
  • ground black or white pepper
  • granulated garlic or garlic powder (I prefer granulated)
  • onion powder
  • sweet paprika and/or sweet pepper flakes (paprika is ground dried red pepper, pepper flakes are crushed dried red pepper)
  • hot paprika, hot pepper flakes, or cayenne pepper (moderately spicy dried ground chili pepper) for those occasional spicy dishes
  • ground turmeric
  • ground cumin
  • ground cinnamon
  • ground ginger
  • ground nutmeg
  • ground cloves (for pumpkin flavors)
  • sugar (granulated)
  • brown sugar
  • chicken consommé powder / beef bouillon powder (regular or vegetarian)
  • onion soup mix
  • onion flakes (substitute for fresh onion—3 tablespoons for 1 medium onion).
  • various herbs
  • additional spices to adapt taste to preference

Misc:

  • oil / margarine / butter / cooking spray
  • coconut cream as a dairy-free cream substitute
  • flavorless milk substitute as a dairy-free milk alternative
  • cornstarch as a thickening agent
  • flour
  • baking powder
  • baking soda
  • bread crumbs or cornflake crumbs (you can make these with your blender or food processor) for coating
  • condiments, such as ketchup, mustard, barbecue sauce
  • tomato sauce/tomato paste/canned tomatoes—diced or crushed/pasta sauce
  • soy sauce (makes a great flavoring for savory foods)
  • ready-made pie crusts and dough (to just add filling)

We always have eggs in the fridge and onions, rice, and potatoes on our shelves, as well as pasta.

In addition, having some fresh vegetables in the fridge, such as carrots, celery, tomatoes, bell peppers (various colors), etc., can be very useful when putting together a quick but delicious meal.

It is also a good idea to have some ground meat or chicken (breast, ground, or in parts) in the freezer for anyone who likes meat dishes in a snap.

Weather can have an effect on some of the spices and on the chicken consommé powder, so I keep as many of the seasonings in the refrigerator or freezer as I can, and I keep everything tightly closed in containers (you will be surprised to know just how determined moths are at getting into sealed bags and how hot red pepper powder can attract little black bugs—YUCK!).

Therefore, store your items well.

Why are these pantry essentials beneficial to have on hand?

Personally, having the above ingredients in my kitchen is very advantageous, as I make a variety of dishes and use most of the items on the list regularly enough to warrant storing them. However, I do not store items for dishes that I make seasonally or only on rare occasions or those that spoil easily.

Whether or not it is workable for you depends on your cooking style, the space you have to store, and whether or not you mind running out to the store as needed. Of course, the more you cook and the more varied your recipes, the more you will use and the more you will need.

Yield: 4 four-ounce servings

Easy Homemade Lox for Passover

Easy Homemade Lox on a cutting board

Homemade Lox, kosher for Passover.

Prep Time 10 minutes
Total Time 10 minutes

Ingredients

  • 1 pound of fresh salmon filet, skinned
  • 1 cup kosher salt
  • 1/4 cup white granulated sugar
  • 4 ounces sprigs of fresh dill, chopped
  • 1 teaspoon coarse ground black pepper

Instructions

  1. In a bowl, mix the salt, sugar, chopped dill, and black pepper.
  2. Lay a length of plastic wrap on the table that is a few inches longer than the piece of salmon and more than twice as wide.
  3. Place half of the mixture from the bowl on the plastic wrap in the size of the piece of salmon.
  4. Cover the top part of the salmon with the remaining mixture.
  5. Wrap the salmon with the mixture in the plastic wrap and place in a baking pan.
  6. Place another baking pan on top of the fish and put a few canned goods (or something similar) in the top pan to weigh it down.
  7. Place in the refrigerator for 2-3 days, pouring out any liquid from the bottom pan and turning the salmon over approximately every 12 hours or so.
  8. After 2-3 days, remove the salmon and wash well (the more you wash, the less there will be of a taste of the dill).
  9. Slice into very thin slices.

Nutrition Information:

Yield:

4

Serving Size:

1

Amount Per Serving: Calories: 295Total Fat: 14gSaturated Fat: 3gTrans Fat: 0gUnsaturated Fat: 10gCholesterol: 71mgSodium: 15202mgCarbohydrates: 15gFiber: 1gSugar: 12gProtein: 26g

Sharing is caring!

Skip to Recipe