Easy moist dairy-free chocolate cake is a simple recipe for a rich and delicious cake for birthdays or any special occasion made without milk or butter. Just add ganache or your favorite frosting.
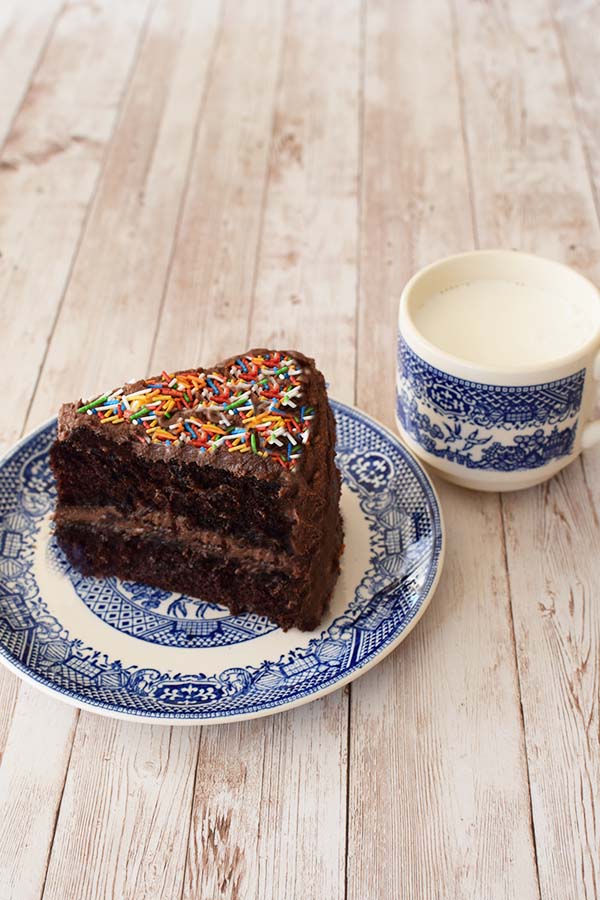
This moist, dairy-free chocolate cake recipe is the best recipe for birthday cake or any party. It's so simple and so good it may just become your go-to chocolate cake.
And it's perfect for people who are avoiding dairy!
Just mix the ingredients in one bowl, pour into cake pans for a layer cake or into a sheet pan for a sheet cake, and bake! Then, add your favorite frosting or ganache. That's it. But don't forget the sprinkles!
Note: The batter is very liquidy, but that's how it's supposed to be, so no worries!
If you are making a layer cake, using wet baking strips around the pans will help prevent the cake from becoming uneven or mounded.
What are some tips for baking?
Preparing the batter
As obvious as that may sound (except to people like me), following instructions when baking is important.
It seems that all too often, bloggers will add extra steps or add extra ingredients, unnecessarily complicating the recipes.
Nonetheless, sometimes what seems unnecessary can be helpful.
That noted, the best way to start, unless directed otherwise, is by putting the dry ingredients in the bowl first and combining them together and then adding the wet ingredients.
I haven't found that it matters much what order ingredients are put in the bowl when it comes to dough. However, with batter, it can make a difference, and it is a good practice to add the wet ingredients, one at a time, blending lightly in between, mixing slowly and thoroughly.
Dumping all of the ingredients in before mixing can leave flour clumps, which may not dissolve while baking, and mixing too quickly will add air bubbles, which can create air gaps in the cake.
Flour clumps, especially the larger ones, may not bake into your cake, and you may find them in your slices. If you have them, remove as many as you can before baking. Using a strainer helps. (Yes, this has happened to me.)
If you find you do have a lot of little air bubbles, gently tap the side of the bowl with your fingers before you pour into the pan (you can do this with the pan if you didn't notice the bubbles until you already poured the batter).
The tapping will pop them (you can actually see this). You may not get rid of them all, but the bigger ones are more important to pop. The bubbles seem to be more of a problem with thinner batter and with thicker batter.
The batter
Before you pour the batter into the pan(s), make sure to coat well with something to help prevent your final products from sticking.
There are various ways to do this, depending on your preference. You can use some type of fat, such as oil or cooking spray, margarine, or butter, with or without sprinkling flour as well. Or you can use baking paper.
My personal preference is to place baking paper on the bottom of the pan(s) and then coat with cooking spray, or vice versa. Baking paper can come in individual sheets or in rolls. For round pans, you can buy a suitable size that will fit right on the bottom of the pan. OR you can place the pan on top of the baking paper, trace around the bottom of the pan, and cut to size.
If you use baking paper, you might find that it won't stay at the bottom of the pan properly while you are trying to pour the batter in, and there are a couple of tricks I use to help. One is to cut the paper so it fits in the pan like a lining, and the other is to wet it so it sticks (the latter is quicker, so I normally use that one).
When making cupcakes or muffins, you can coat or you can use cupcake paper. I have found that with some brands, however, while the paper won't stick to the pan, it will stick to the cupcake, so you might want to lightly spray the paper before you pour in the batter.
If you are making a layer cake, separate the batter equally into both pans. The best way to do this is to weigh the pans with batter to make sure they are even. Personally, I just eyeball it (which is probably not the best idea unless you have a good eye).
Baking
Ovens often vary in how they spread heat, something that can cause uneven baking. This can cause a variety of problems in baking, such as lopsided cakes, raw middles, over-baked sides, etc.
One way to help prevent this is to turn your pan around on the shelf in the middle of baking to help ensure it will bake more evenly.
Another reason for uneven baking, where the item comes out fine on the top and burnt on the bottom, is if a crumb or a piece of something is at the bottom and will burn as you bake.
If your cake comes out lopsided, one way to fix that is to slice off the uneven part before putting on the frosting. I hate losing cake, so when it does this, I will slice approximately halfway through the higher part and flip it over onto the lower part before adding the frosting.
To help prevent lopsidedness in the first place, this method is often used: take a strip of aluminum foil that is around 4-6 inches longer than the circumference or perimeter of your pan and lay the wet paper towel on it, then fold the foil over the paper towel lengthwise so it is just a bit less wide than the height of the pan.
Wrap the foil around the pan and slide one end in the other (crimp it a bit if you need to so it will hold). This will create a moisture barrier for baking (I have read that some people put a pan of water in the oven when baking).
I found all of that a little tedious, so I bought cake strips. These are absorbable cotton belts, around 2" wide, and come in a few different lengths to be wrapped around and secured on round cake tins. These are soaked (but not dripping) when you wrap them around the pan.
If you need to use them for a larger rectangular pan, you can just attach a number of them together.
Cooling
You know your baked good is ready when a toothpick can slide cleanly and easily in and out of the baked item (or when the top is a little firm and springy), it can be removed from the oven.
Leave to cool for 10-15 minutes.
If you are going to remove the item from the pan, run a knife around the sides between the cake and the pan. Place a plate or cooling rack over the top and flip.
If you want the top side to remain on the top, you will flip the item over twice (once to remove it from the pan and once to get it back).
For cupcakes and muffins, I recommend using cupcake paper, and after you have used the knife to loosen them from the cup, you should be able to just pop them out carefully using the same knife.
Frequently Asked Questions (FAQs)
Is this chocolate cake really dairy-free?
Yes! This easy chocolate cake is made completely without milk, butter, or dairy, using oil and water to achieve its rich moisture.
Why is the cake batter so thin and liquidy?
The batter for this cake is naturally very thin and pourable. This unique consistency is what creates the incredibly moist, tender crumb, so there is no need to worry!
Can I use this recipe to make cupcakes?
Yes, absolutely. This batter easily converts into cupcakes. Just pour the batter into a lined muffin/cupcake tin and adjust the baking time down to about 15 to 20 minutes, but check with a toothpick to see if they are ready after 15 minutes. If not, rotate the pan and continue making until ready.
What kind of frosting goes best with this cake?
You can pair this cake with any of your favorite frostings, such as a buttercream, chocolate ganache, or a simple dusting of powdered sugar. Just make sure that whatever you use doesn't contain any dairy if you want to keep this a dairy-free dessert.
How should I store leftover chocolate cake?
Store your frosted cake in an airtight container at room temperature for up to two days, or keep it in the refrigerator for up to five days.
Can I freeze this dairy-free chocolate cake?
Yes, absolutely! You can freeze the baked cake layers for up to 2 to 3 months. Let the layers cool completely, wrap them tightly in plastic wrap followed by aluminum foil, and freeze. Thaw completely at room temperature before frosting and serving.
Can I freeze this chocolate cake with the frosting?
Yes, you can freeze this cake after it has been frosted. Just place the cake in a freezer-safe, airtight container and set it down on a flat surface in the freezer.
General FAQs and information about baking:
Why do recipes have salt in the ingredients of baked goods?
Even though salt tends to make foods, well, salty, it actually plays other roles in baking as well.
For example, the right amount of salt balances flavors in baked goods; it can bring out the sweetness of sugar and, at the same time, prevent them from tasting overly sweet. It also can help dull the bitterness of cocoa.
Salt prevents baked goods from tasting bland, while it balances the richness of the fats. It also helps develop flavor in yeast breads and works with proteins to strengthen gluten and make it more elastic.
Salt also slows down yeast fermentation because it prevents the yeast from eating up the sugars too quickly, which otherwise would cause the dough to rise too fast and then ultimately collapse, causing bread to come out flat instead of fluffy.
Salt helps baked goods stay a little fresher for a little longer and helps delay mold from growing on them.
What is the difference between white granulated sugar and brown sugar?
The short answer is that while white granulated sugar is just pure sweetness, brown sugar is white sugar with molasses mixed into it.
Here is how that change affects your baking:
- White sugar is neutrally sweet. Brown sugar tastes like rich caramel or toffee.
- White sugar makes things crisp and light. Brown sugar traps moisture, making baked goods (like brownies) dense, soft, and extra chewy.
- Brown sugar is dark and wet; white sugar is dry and clear.
Tip: If a recipe calls for brown sugar and you're completely out, you can make your own by thoroughly mixing a tablespoon of molasses into a cup of regular white granulated sugar, and that will give you light-brown sugar. If you want dark brown sugar, you need to mix in more molasses.
What is the difference between baking soda and baking powder?
Baking soda and baking powder are both synthetic leavens that help baked goods rise, but there is a difference between them.
Baking soda is pure sodium bicarbonate, which needs another ingredient that is acidic in order to be activated. When the baking soda touches the acid, it creates a carbon dioxide gas, which helps the baked good rise. Baking soda is between 3 and 4 times stronger than baking powder, and if too much baking soda is used, your baked good will end up with a metallic flavor.
Baking powder is baking soda that is already mixed with an acid and a stabilizer and will be activated by moisture and heat. Nowadays, baking powder is called double-acting because it activates twice-once when it gets wet (when you mix the ingredients together) and again when it heats in the oven.
Replacing one with the other can be tricky, and it's not recommended. However, if you have no choice, then do solid research for substituting one for the other for the baked good you are preparing so you don't ruin it.
What do eggs do in baking?
Eggs are made up of two parts: the whites and the yolks (the yellow).
Egg whites are made up of protein that sets when heated and helps baked goods hold their structure. The yolks are made up of fats and vitamins and help ingredients bond.
Eggs also help baked goods rise as well as keep them moist.
It is important to have the right amount of eggs when baking, because if there are too many eggs in a recipe, this can cause a rubbery, dense texture, and if there are too few eggs, this can cause a crumbly, dry texture.
The different parts of the egg will provide different textures to baked goods; using the entire egg in baking will provide moisture and help the baked good rise evenly, using extra yolks will create richer, denser textures, and extra whites will add fluffiness but may create a drier texture.
What is the difference in using oil vs. butter or margarine?
Both margarine and butter are solid fats at room temperature, and both contain more saturated fats than oil.
While margarine and butter will change from a solid to a liquid when heated, they will change back to solids when cooled again. Oil stays liquid at all temperatures. Oil also coats flour better in the preparation process before baking.
Butter "creams" better than margarine, but one cannot cream oil at all.
When converting a recipe from butter or margarine to oil, the general conversion rate is 1 to ¾ (although if you are doing more than one batch, you might need to reduce the oil because I have found that baked goods come out oily in this case).
And when converting from oil to margarine or butter, typically the ratio is 1 to 1¼, and from margarine or butter to oil, the ratio is typically 1 to ¾.
What is the difference between real vanilla extract and imitation vanilla?
Real vanilla is made from soaking vanilla beans in alcohol, imitation vanilla is synthetic, and real vanilla costs quite a bit more than imitation. Whether or not there will be a taste difference in your baking depends on the baked good, so do some research before you decide.
I personally always use the imitation as long as I have a really good brand because it's not worth it to me to spend the extra money.
Should I sift flour before I use it?
Unless you are concerned about bugs or clumps from moisture, the need to sift depends on your recipe.
For example, you don't need to sift for dense baking like muffins or quick breads, where lumps won't ruin the texture. But you should sift for recipes that rely on air bubbles, such as sponge or angel cakes or soufflés. You also should sift your flour if you are making baked goods with a high fat content, such as brownies, because it is important that the fat be absorbed throughout all of the flour, and having flour clumps could prevent this.
Sifting the baking powder and/or baking soda together with the flour and salt before mixing in the other ingredients may be able to help prevent cakes from coming out lopsided, where one side may be somewhat higher than the other.
What equipment is good to have in my kitchen for convenient baking?
- a stand mixer, which I use mostly for dough and sometimes for whipping
- a hand mixer (for things that aren't dough, and I don't want to mix manually)
- a kitchen scale
- different sizes and shapes of baking pans, including loaf pans
- mixing bowls (or just large bowls-I have plastic, glass, and metal)
- cookie sheets
- pie dishes
- dry measuring cups
- liquid measuring cups
- measuring spoons
- whisks
- rubber spatulas (really good for when you don't want to leave anything in the bowl)
- rolling pins
- a baking mat for rolling out dough
- baking strips
- a good supply of baking (or parchment) paper (also round for layer cakes)
If I want to be able to bake on short notice, which ingredients are good to keep in my kitchen?
- flour
- white granulated sugar
- brown sugar (light/dark-I usually keep dark)
- confectioners' sugar (powdered sugar)
- salt
- baking powder
- baking soda
- cocoa powder
- ground cinnamon
- ground nutmeg
- ground ginger
- ground cloves
- baking chocolate
- chocolate chips
- instant dry yeast
- vanilla and/or vanilla sugar
- cooking oil/cooking spray
- margarine or butter
- eggs
- honey
- instant coffee
- various toppings, frostings, fillings
- various extracts (real or imitation)
- whipping cream
- packaged pie dough or ready-made pie crusts
- puff pastry dough
For people who don't want to eat chocolate but still want a festive cake
Try
Delicious and unique dairy-free cookies that are great for parties
Dairy-Free Cowboy Cookies
Dairy-Free S'more Cookies
Dairy-Free Rocky Road Cookies
Easy Moist Dairy-Free Chocolate Cake Recipe
Moist chocolate cake recipe made without milk or butter.
Ingredients
- 2 cups all-purpose flour
- 2 cups white granulated sugar
- ¾ cup unsweetened cocoa powder
- 2 teaspoons baking powder
- 1 ½ teaspoons baking soda
- 1 teaspoon salt
- 2 cups hot black instant coffee (2 cups hot water + 2 teaspoons instant coffee)*
- ½ cup oil
- 2 large eggs
- 1 tablespoon vanilla
- Frosting or genache (dairy-free), as desired
Instructions
- In a large mixing bowl whisk together flour, sugar, cocoa, baking powder, baking soda, and salt.
- Add water or coffee, oil, eggs, and vanilla and mix until smooth. The batter should look somewhat liquidy.
- Line the bottom of 2 9-inch round cake pans with baking (parchment) paper and spray the inside of the pan with cooking spray or coat with oil. **
- Pour the batter evenly into the pans.
- Place in an oven that has been preheated to 350°F and bake for approximately 30 minutes or until the layers are firm to the touch and a toothpick inserted into the center of the cake comes out clean.
- Remove from the oven and let cool.
- Carefully run a butter knife around the inside edge of the cake to release it from the pan. Then, flip the layers over onto a plate or cooling rack to finish cooling (if you use a cooling rack, you will need to place it on your serving plate later).
- Using a bread knife, slice off the uneven parts of the cake to level it if need be. ***
- Frost one layer of the cake and flip the other layer over on top of it.
- Frost the top and sides of the layer cake and decorate as desired.
Notes
* The coffee enhances the chocolate flavor, but you can just use 2 cups of hot water if you wish.
** If you want to make a sheet cake instead of a layer cake, use a coated/lined 9" x 13" pan.
*** See baking tips in the post.
Nutrition Information:
Yield:
12Serving Size:
1Amount Per Serving: Calories: 487Total Fat: 13gSaturated Fat: 1gUnsaturated Fat: 12gCholesterol: 31mgSodium: 493mgCarbohydrates: 84gFiber: 4gSugar: 42gProtein: 8g